Friday, January 2, 2009

Spicy Cashews

This is one of my favorite Christmas gifts to make for friends. Spicy cashews! They are so delicious and really easy to make. I like them plain, they are good served alongside beer, and I also chop them up over vanilla ice cream. The original recipe comes from The Yellow Farmhouse Cookbook by Christopher Kimball. I always add more cayenne and cumin. I will publish the original recipe, you can make your own variations.

Spicy Cashews
The Yellow Farmhouse Cookbook
Christopher Kimball
1 egg white
1 tbsp water
1 lbs salted cashews
1/3 cup sugar
2 tsp cumin
2 tsp coarse salt
1 tsp cayenne pepper

1. Heat oven to 250 degrees.

2. Whisk the egg white with the water until foamy, add cashews and stir till well coated.
Transfer to a strainer and let drain for 2 minutes.

3. Mix the remaining ingredients together and add the nuts, tossing to coat as evenly as possible. Spread the cashews on a baking sheet in a single layer.

4. Bake for 40 minutes, remove from oven and gently turn them over, try to keep them in a single layer. Bake for another 20-30 minutes.

5. Loosen with a spatula and let cool. These aren't good to eat until they are completely dry. They store well but trust me, one batch won't last long!

Sunday, December 7, 2008

It's a Gingerbread House

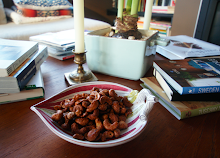
Years ago I bought a book by Vera Williams called, "It's a Gingerbread House". You can't believe what a great discovery this was for me as a young parent. It is a simple story about a Grandfather passing on the family gingerbread recipe. The directions are written in story form and my daughter and I have made one every year. I still have the original templates tucked in the book for safe keeping. I'm not going to post the recipe, which makes really tasty cookies, because I think people should buy their own copy. Here's where you can find it on Amazon. I'm sure it's in local bookstores as well. The picture above is our gingerbread house this Christmas, our first winter in Portland. My daughter and her friend ate at least as much candy as they used on the house. This is a simple project, the recipe couldn't be easier, and it's a ton of fun.

Thursday, December 4, 2008

A traditional bolognese

It's December in Portland but it still isn't cold.
In Vermont, by now, I would have made our sausage ragu 3 or 4 times as a way of warding off the freezing weather. I understand the temps there have already gotten down into the 20's with some light snow. After spending ten years in Vt., I know comfort food is important when it gets cold. It warms you to the bone and gives you hope that you might survive the winter.

I haven't had the desire to eat a solid meal like Ragu yet because I haven't experienced that weather trigger. My daughter however, is missing our traditional comfort food so, as a compromise, I checked out a number of Bolognese recipes and tweaked the following one to make it as light as possible. By light, I mean in how you perceive it, how it hits your stomach, not it's caloric content. This recipe takes about 3+ hours but is definitely worth the effort. We made it with spaghetti but I would also like it with rigatoni.

Ingredients
1 Tbs vegetable or olive oil
3 Tbs butter
2/3 cup finely chopped onion

3/4 cup finely chopped celery

3/4 cup finely chopped carrot
1 pound ground beef

Salt to taste
Freshly ground black pepper

1 cup milk

1/8 tsp ground nutmeg
1 cup dry white wine (If it isn't dry your sauce will be swet, some people like it that way)
1 1/2 cups canned imported Italian plum tomatoes in their juice, cut up
1 pound pasta
3/4 cup freshly grated parmigiano-reggiano cheese

Directions
1. Put the oil, butter, and chopped onion in the pot and turn the heat to medium. Cook until the onion's translucent, then add the celery and carrot and cook for 2 minutes more until coated well.

2. Add the ground beef, a large pinch of salt, and fresh pepper to taste; crumble the meat and stir until the beef has lost its red color. [Don't take it too far here; remember, it's going to cook for a few hours more.]

3. Add the milk and let it simmer gently, stirring frequently, until it has bubbled away completely. (If it doesn't completely cook off it will when you cook down the wine in the next step.) Add 1/8 tsp of nutmeg and stir.

4. Add the wine and raise the heat to med-hi to reduce it down. Then turn the heat to lo and add the tomatoes with all of their liquid. At this point you want to slow cook the sauce, uncovered, for about 3 hours. Don't forget to stir occasionally and keep an eye on it because it may start to dry out. If this happens add a half cup of water when necessary. However, there should be no water at the end of the cooking time. Don't panic if it gets a little dry. You can always add some of the pasta water.

5. After 3 hours turn off and cook your pasta. Make sure you salt the pasta water in case you use it to wet your sauce. Strain pasta when it is al dente and add to your Bolognese with an extra tbsp of butter. Mixing thoroughly.

Serve with lots of grated Parmesan and enjoy!


Wednesday, September 10, 2008

Alma Chocolates in Portland

We were on Alberta Street having a coffee and the barista gave us the low down on the Portland chocolate scene, according to her. After listing all of the stores she highly recommended we trek to the North East side of town to check out Alma Chocolate.

I am so glad we did. Not only is the store incredible cute but the chocolate is amazing. The Basil flavored one was such a surprise, really successful and they had a number of spicy truffles including a paprika chocolate which M. cared less for then me but I thought it was interesting.

We are going back this weekend to pick up some of their bark which looked terrific. We can't wait till my sister, who makes chocolates back in Vermont, visits.

Finally, I am going to try the bacon caramel in honor of my friend Ross who thinks bacon is the best. I know it is all the rage but it just doesn't appeal to me. Who cares! I'm trying it!

Bluehour Restaurant in Portland


Life is always interesting.

My sister gave us a gift certificate to a wonderful restaurant in Portland called bluehour for our birthdays. We happily dressed the celebratory part and went out last Saturday evening. As we approached the restaurant, which has a patio out front, we noticed what appeared to be picketers taking laps through the patio. I though maybe they were underpaying their dishwashers but as we got closer we could hear them chanting, "foie gras sucks...force fed ducks"!!!!!

We crossed the picket line, a first for both M. and me, and made our way to the reception area. As we stood there waiting about 8-10 police officers arrived to try and encourage the protestors to leave. Oddly enough they were wearing latex gloves. Not sure what they were expecting but it might help if they decided to prep some onions in the kitchen.

The host quickly seated us inside where we could only faintly hear the chanting over the bar music and here is our secret confession...we ordered the foie gras! ugh! This restaurant is known, as if that wasn't obvious, for it's foie gras. And, it was amazing. Produced in California and perfectly prepared, we enjoyed every last bite. The rest of the meal was also remarkable, truly.

By the time we left, almost 3 hours later, the streets were empty. Maybe the protestors had moved onto a late night clinic. Strange how people feel compeled to make decisions for you, right? That is what it boils down to after all. Can I decide what I want to eat or should someone else like the government, or radicals, or coca cola tell me what to have or have not.

Sunday, August 31, 2008

Our first breakfast in Portland

This delicious plate was served to us this morning at the Tin Shed in Portland, Oregon. Yesterday W's daughter called to wish me happy birthday and told us to go immediately to this restaurant. First, we are very loyal to our favorite place, Penny Cluse, in Burlington Vermont. The food there is so good, so tasty, so spicy that we are disappointed at almost every other breakfast place.
The Tin Shed however was amazing and is neck-in-neck with Penny Cluse, something I thought would never happen. I had the plate above, spicy chorizo and eggs on potato rosti with fresh salsa and a biscuit. The heat level was medium to high with a smokey taste, really good. M. had black beans and rice with tortillas and eggs, simple yet perfectly prepared. A great dish. We can't wait to go back....possibly next weekend. We think we can bike there pretty easily so as soon as our stuff arrives on the truck we're going to ride over on 2 wheels.

Monday, June 16, 2008

New camera and a spicy fig sauce for dessert

I've been waiting to post, my trusty Canon Powershot of 5 years finally called it a day. It took me a couple of weeks but I finally have a replacement and I'm so happy!!!! I switched to a Sony after really looking and shopping around, I can be irritating that way but it was worth all of the effort. My new camera is great and with a little direction from me, it takes amazing pictures.

I have made 2 things recently that I really liked. One is this sour cherry pudding pictured here. I can't pass this recipe along, a friend was nice enough to share one of his Grandmother's recipes that they are publishing in a family cookbook. Needless to say, it was amazing and unusual. It bakes up like a crusty biscuit. I served it with vanilla ice cream.

I also bought beautiful figs over the weekend. I served them with the Goat Cheese Custards that are already posted here. You could also serve this over ice cream, especially caramel or a dulce de leche. It's a two part process but totally worth it and you can make modifications easily. Unfortunately everyone devoured them before I could get a picture....next time!


Spicy Fig Sauce

Yield: 1/2 cup
2 tablespoons sugar
1/4 cup freshly squeezed orange juice, warm
1/2 cup chopped fresh figs
1 star anise
3 whole black peppercorns

1. Cook the sugar in a heavy-bottomed sauté pan over medium heat for 3 minutes, or until golden brown. Watch closely, it burns quickly.

2. Add the orange juice and bring to a boil. Add the figs, star anise, and peppercorns, bring to a boil, and cook for 3 minutes or such.

4. Remove from the heat and strain through a fine-mesh sieve, pushing on the solids to remove as much liquid as possible, don't be shy about this step. If necessary, thin with a little warm water to a sauce consistency.

5. To prepare the figs: Cut the tops off 6 of the figs. Use a small spoon to press a cavity into each fig and dip the whole fig in simple syrup. Fill the figs with the port. Place the filled figs on a sheet pan and bake at 350 degrees for 25 minutes, or until they have softened. Slice the figs in half lengthwise and then cut them crosswise into 1/4-inch-thick slices. Warm the slices in the remaining simple syrup. Even though the figs are pretty served whole, they are difficult to cut into pieces with a spoon.

I served the sliced figs with the sauce over the goat cheese custards. Really, really good.

Simple Syrup

1 cup sugar
1 cup water

In a medium saucepan combine sugar and water. Bring to a boil, stirring, until sugar has dissolved. Allow to cool.

Tuesday, June 3, 2008

Socca Socca Socca


This is a delicious quick bread that is made from chickpea flour so it's gluten free and really tasty. It's crispy, toasty and has a smokey, roasted flavor, it's that sort of snack. I really like it with a ton of pepper but it was also excellent with the rosemary and onion. I saw this a while ago in the NYTimes and then Mark Bittman mentioned it on his blog and David Lebovitz wrote about it a year ago. So I broke down and tried it. I say broke down because I'm trying to eat fewer carbs, ha, impossible. This is one of those simple recipes that is easy to get right time after time and it's really tasty. I made this multiple times and the best recipe mash-up is below.

Socca

1 cup chickpea flour
1 teaspoon salt
1 teaspoon, at least, ground black pepper
4 to 6 tablespoons olive oil
½ large onion, thinly sliced, optional
1 tablespoon fresh rosemary leaves, optional.

1. Heat oven to 500 degrees. Put a well-seasoned large cast-iron skillet in the top half of the oven for 20 minutes before using. Sift chickpea flour into a bowl; add salt and pepper; then slowly add 1 cup lukewarm water, whisking to eliminate lumps. Stir in 2 tablespoons olive oil. If using onion and rosemary, stir them into batter. Cover, and let sit while the oven heats, or as long as overnight. Batter should be about the consistency of heavy cream. Add water if it isn't.

2. Pour 2 tablespoons oil into heated pan, and swirl to cover pan evenly. Put back in the over for 5 minutes then pour in batter in a thin layer, and bake 5 minutes, or until pancake is firm and edges set. Then turn the broiler on and cook for another 3-4 minutes. You can let it brown in spots. Remove from oven, sprinkle with fresh ground pepper, cut it into wedges, and serve hot.

Thursday, May 29, 2008

Favorite Breakfast variation - Pancake with Apples

I make a puffy pancake for breakfast that is so good and really easy. You heat up 1/4 cup butter in a 9 inch skillet. Then you mix two eggs, 1/2 cup milk and 1/2 cup flour, leaving the lumps in, and pour that into the skillet when the butter is really hot but not brown yet. That goes into the oven for 15 minutes. It comes out completely puffed up. I sprinkle sugar over the top and put it back in for a couple of minutes. Then I squeeze a lemon over the top right before slicing and serving. So good and best eaten immediately.

Tonight I made a variation for dessert. I sautéed 2 apples in brown sugar and then added them to the batter that I usually make. I also threw in some vanilla and salt for good measure. It came out quite good. Let the pancake sit in the pan a minute to absorb some of the caramel sauce in the bottom before serving. And definitely saute the apple slices on med high for 10 minutes so they take on the caramel taste of the sugar. We had ours with vanilla ice cream, excellent vehicle for it.

Puffy Apple Pancake


2 apples, skinned cored and thinly sliced
4 tbsp brown sugar
1/4 cup butter
2 eggs
1/2 cup milk
1/2 cup flour
1/4 tsp vanilla
1/4 tsp salt

1. Preheat the oven to 425 F.

2. In a large oven safe skillet over medium-high heat, combine ¼ cup butter, 3 tablespoons brown sugar stirring until sugar is dissolved. Add apple slices and cook until evenly coated and tender, about 10 - 12 minutes. Reserve and keep warm.

3. In a medium bowl, whisk eggs, milk, flour, vanilla, remaining brown sugar and salt together. Stir the apple slices into the egg/milk mixture. Melt the remaining 2 tablespoons butter in the same skillet over medium heat. Pour the batter into the skillet, then place the skillet into the preheated oven.

4. Bake until puffed and golden, about 15 - 20 minutes. Remove and sprinkle top with sifted confectioners sugar. You can serve this with ice cream, or with yogurt and a small drizzle of honey, maple syrup or some reduced, thickened apple liqueur.

Sunday, May 18, 2008

Mark Bittman's Banana almond chocolate chip cake

Whenever I make a savory dish of Mark Bittman's I'm usually happy. He gets flavor, texture and contrast. Sometimes dessert is a disappointment. Recently on his blog, Bitten, he posted a recipe for a banana cake that he said was his Mother's favorite cake. Well, when you invoke the M word I have to try it. It's a great recipe and I think you could split it between two loaf tins if you wanted. The texture is perfect, just like a fine cake with a hint of nuttiness from the roasted almonds. The half and half also adds richness along with the chocolate. Don't throw in more chips than specified, it is the perfect amount as is. I am definitely making this again. You can serve it with whipped cream but I promise you, it is perfectly good without.

Banana Cake with Chocolate Chips and Almonds
By
Mark Bittman

4 ripe bananas
1 1/2 tablespoons baking soda
1/4 teaspoon vanilla
2 eggs
1 cup plus 1 tablespoon sweet butter, room temperature
1 cup white sugar
1/2 cup light brown sugar
2/3 cup half and half
2 1/2 cups flour
Pinch of sea salt
Pinch of cayenne
1/2 cup whole raw almonds
1/2 cup semi-sweet chocolate chips

1. Melt 1 tablespoon of butter and paint the inside of a 9 x 3 round cake pan with it, then put the pan in the freezer for 30 minutes. (The frozen butter prevents the batter from sticking to the pan.) On a cookie sheet bake the almonds in a 350 degree oven for 20 minutes, turning every 5 minutes or so; let cool, roughly chop, and set aside.

2. In a bowl mash the bananas with a fork, add the baking soda and vanilla. Stir well and set aside. In a mixer use the whisk to cream together the softened butter and both sugars. Add the eggs, mashed bananas, half and half and whisk until blended. Add the sea salt and cayenne to the flour and than mix the dry ingredients into the batter half a cup at a time, being careful not to over-beat (a lesson I've happily learned from Mark). Remove the bowl from the mixer. Use a rubber spatula to blend in the almonds and chocolate chips. Pour the batter into the buttered cake pan; it will only fill the pan half-way.

3. Bake the cake in a 350 oven for 60-70 minutes, turning the pan every 20 minutes so the cake cooks evenly. Test to see if the cake is done by inserting a wooden skewer. If the top is browning too quickly, lightly lay a sheet of aluminum foil over the top. When the skewer comes out clean, take the cake out of the oven and place it on a wire rack for 30 minutes. Remove the cake from the pan, putting it back on the wire rack to finish cooling.

4. Just before serving dust the top with powdered sugar and shaved chocolate. Serve warm or at room temperature with vanilla ice cream or freshly whipped cream.

Monday, May 12, 2008

Oatmeal White Chocolate Chunk Cookies

C to the 3! Chocolate Chunk Cookies that aren't ruined by white chocolate. I know, everyone is only eating dark chocolate. White and milk are being shunned by everyone but me...Ok, and a few others.
First, I bought another Milk chocolate bar by Green and Black with almonds. Wow, so good. Rich smooth chocolate taste with a smoky almond crunch. So worth crossing that dark chocolate line in the sand.
Second, I was reading smitten kitten earlier. If you haven't checked them out yet please do, they post some solid recipes. He had just posted this cookie recipe that M. and I made tonight. I didn't alter a thing. The salt is a great addition, it really works with the butter. I purchased the oats at our local market which were great, super fresh. Stale oats are the worst.
Great recipe, I highly recommend it. The cookies are crisp and crunchy with a soft chewy center. 5 to the C!
Anyway, hit the link above to see the recipe on their site or check it out below.

Oatmeal White Chocolate Cookies
Adapted from Cook's Illustrated

1 cup all-purpose flour
3/4 teaspoon baking powder
1/2 teaspoon baking soda
1/4 teaspoon table salt
14 tablespoons (1 1/2 sticks) unsalted butter, softened
1 cup sugar
1/4 cup packed light brown sugar
1 large egg
1 teaspoon vanilla extract
2 1/2 cups old-fashioned rolled oats

6 ounces good-quality white chocolate bar, chopped (not "white chocolate" chips; they're almost always artificial. I am adamant about this.)

1/2 teapoon good quality flaky sea salt (for sprinkling on top)

1. Preheat oven to 350 degrees. Line baking sheet with parchment paper or Silpat. Whisk flour, baking powder, baking soda, and table salt in a medium bowl.

2. Beat butter and sugars until light and fluffy. Scrape down bowl with rubber spatula, then add egg and vanilla and beat until incorporated. Scrape down bowl again. Add flour mixture gradually and mix until just incorporated and smooth. Gradually add oats and white chocolate and mix until well incorporated.

3. Divide dough into 24 equal portions, each about 2 tablespoons. Roll between palms into balls, then place on lined baking sheets about 2 1/2 inches apart. Using fingertips, gently press down each ball to about ¾-inch thickness.

4. Sprinkle a flake or two of sea salt on each cookie

5. Bake until cookies are deep golden brown, about 13 to 16 minutes, rotating baking sheet halfway through. Transfer baking sheet to wire rack to cool.

Saturday, May 3, 2008

Goat Cheese Custard with Strawberries

Another rainy Spring Saturday. I've cleaned every cabinet since discovering some unwanted guests...I leave you guessing on that one. I also went and saw the new movie Iron Man. I actually enjoyed it. I read a lot of comics growing up and I feel pretty protective of them. Nothing irritates me more than a lot of money being thrown at a movie that ends up sucking.
First, Jeff Bridges, who doesn't love him? He is insane! He brings all the weight to this movie and even though Gweneth Paltrow is weak at times he more than makes up for it. The there's Robert Downey Jr. with a super tight performance. He plays it straight with just enough depth to suggest character. For a comic book hero that's the perfect approach. Some scenes had me on the edge of my seat and even though he should have died, won't tell you when, I still throughly enjoyed the movie, start to finish, even the stale popcorn which I ate all of...by myself.

On a better food note, David Lebovitz posted this last week and I finally made it. Really good, tangy and sweet. I poached the strawberries in the wine and added smoked cinnamon and black pepper. When you want something late at night but you're taking a break from ice cream...you know who you are...this is a good alternative.

Goat Cheese Custard with Strawberries
By David Lebovitz

5 ounces fresh goat cheese, at room temperature
1/4 cup sugar
1/2 cup cream
2 large egg yolks
1/8 tsp vanilla extract

1. Preheat the oven to 350F

2. Place four custard cups or ramekins in a deep baking dish or pan.

3. Blend together the goat cheese, sugar, cream, egg yolks, and vanilla for 30 seconds until very smooth.
4. Divide the mixture into the custard cups; each should be a bit more than half full.

5. Add warm tap water to the baking pan, to make a water bath for baking the custards. The water should reach to about halfway up the side of each custard cup.

6. Cover the pan with foil and bake for 20-minutes.

7. When done, remove the custards from the water bath and cool completely.

Strawberry sauce
1/2 cup red wine
3 tablespoons sugar
1/2 to 1 small basket of strawberries
1/4 tsp cinnamon
Pinch of freshly ground black pepper

1. In a non-reactive skillet, cook the red wine and sugar until the bubbles get thick.
Once the syrup is reduced to half its original quantity, 1/4 cup, remove from heat and scrape into a bowl to cool completely.

2. Rinse, hull, and slice strawberries. Toss in syrup, add cinnamon and black pepper and let stand for a minute to two, then spoon onto custards.

Friday, April 25, 2008

Caramelized Spicy Peanuts

This is my mash up of two recipes from David Lebovitz. He had posted a praline almond recipe a while ago that I tried exactly as posted. They were good without being incredible. Then he posted a caramelized peanut recipe a couple of days ago. I decided to sort of do both at once. I choose peanuts and added cinnamon, chili, and butter. They turned out great and totally worth all of the stirring that you have to commit to in order to make them.

Really, lots and lots of stirring. Put on a good radio program and settle in by your stove top.
Good with a beer or served over ice cream which is my plan.
Always dessert oriented…what can I say? I love dessert.


Caramelized Spicy Peanuts
2 cups raw peanuts
1 cup sugar
1/3 cup water
A pinch of coarse sea salt (or smoked salt)
1 tsp ground cinnamon
1 tsp chili powder
1 tablespoon butter

1. In a wide, heavy-duty skillet, mix the peanuts with the sugar and water. Cook the ingredients over moderate heat, stirring frequently, until the liquid seizes up. It will take 5 minutes or so. Don’t get impatient…it will happen.

2. The peanuts will get crusty and the sugar will crystallize.

3. Then the peanuts will become dry and sandy, which is perfectly normal. Lower the heat and keep going, scraping up any syrup collecting in the bottom of the pan and stir the peanuts in it, coating them as much as possible. If the sugar isn’t caramelizing turn the heat up a little.

4. As you go, tilt the pan, removing it from the heat from time-to-time to regulate the heat and the syrup, so you can coat the nuts with the liquid as it darkens without burning the peanuts or the syrup. This is the only tricky part—I like to get the peanuts as deeply-bronzed as possible. if the mixture starts to smoke, remove it from the heat and stir.

5. I sprinkled the peanuts with a sizable pinch of flaky salt. I also sprinkled on cinnamon and chili powder while mixing the peanuts

6. When the peanuts are dark and coated remove from heat and mix in the butter and stir till fully mixed in. Then, tilt them out onto a baking sheet or a marble countertop.

7. Let the peanuts cool completely, then break up any clumps. Store in an airtight container, where they'll keep up to a week.

Monday, April 21, 2008

Dorie Greenspan Coffee Cake

Yes, I am a fan of Dorie Greenspan. I've been working my way through her baking book and I like pretty much everything. On Sunday I made her Sour Cream Coffee Cake with interesting results. First, I have to admit I changed the recipe. Usually I make it exactly as printed the first time but I had some almond cream left over and decided to add it to the cake. I made it Sunday night so we could have a piece warm with ice cream for dessert and then I'd serve it again for breakfast the next day. Because I decided to add my almond cream I removed a half cup of sugar and the raisins from her recipe.

Mistakes? Yes, I should have cut the crumb mixture in half. The way I constructed the cake was by putting 1 quarter of the batter in the bottom of the bundt pan. Then I pipped in the almond cream. Then I layered 2 quarters of batter on top of this. Then I layered in the crumb mixture and topped with the final quarter of batter. Too much crumb, the top layer had a hard time connecting, literally, to the cake. Some of the chocolate and cinnamon sugar leaked out the side and really cooked to the pan making extraction difficult.

When I did remove the cake it was very floppy. I didn't even cup a piece for dessert for fear it would collapse. Instead I served it for breakfast. The cake has orange zest, cinnamon, chocolate, pecans and almond cream...almost too much on first try. We had it again this morning and it was much better. All of the flavors had mellowed and were quite good. Also, the cake was a little dryer this morning making it easier to dunk in my coffee cup. I do think the almond cream was a good addition. you can decide to experiment or not!

Coffee Cake
For the filling
1/2 cup sugar
1/2 cup chopped pecans
2 ounces bittersweet chocolate chopped
1/3 raisins or currants
2 1/2 tsps ground cinnamon
pinch of nutmeg
pinch of salt

For the cake
2 cups flour
1 tsp baking powder
1/2 tsp salt
1 3/4 cups sugar
Grated zest of one orange
8 ounces unsalted butter
2 large eggs
1 1/2 tsp pure vanilla
1 cup sour cream

1. Pre heat the oven to 350 degrees. Center a rack in the oven. Butter a 9-10 inch (12 cup) bundt pan. Dust the interior with flour.

2. To make the swirl, mix all of the ingredients together in a bowl.

3. Cake: Whisk together the flour, baking powder and salt.
In the bowl of a standing mixer, add the sugar and orange zest, mixing with your fingers till incorporated. Now add the butter. With the paddle or whisk attachment beat on medium speed for 4 minutes. Add the eggs one at a time, beating for a minute inbetween. Beat in the vanilla. Reduce speed to low and add sour cream. Still working on low, add the flour mixture and mix only until incorporated.

4. Scoop one third of the batter into the bundt pan. Evenly sprinkle on half the swirl mixture. Layer in the rest of the batter. With a spatula make a shallow indentation in the center ring of the batter. Fill it with the remaining swirl mixture. Cover the mixture with the batters on the side. It doesn't have to be perfect.

5. Bake for 60-65 minutes or until a knife comes out clean. Transfer to a rack and let cool for 10 minutes. Then unmold and cool to room temp.

Don't forget, this cake gets better the next day.

Friday, April 18, 2008

Incredible Milk Chocolate - Michel Cluizel's Grand Lait

My favorite local store Amandine has started carrying this chocolate by Michel Cluizel It's a milk chocolate bar with 45% cacao. Please go buy it, it is amazing. The only reason I'm going to bike this afternoon is so I can justify eating half a bar at lunch. And when I say half a bar...I'll probably eat the whole thing. It is only 3.5 ounces after all. It has an interesting smokey taste, the bar is very smooth. The creamy milk chocolate and the dark chocolate are perfectly balanced so you get to enjoy both aspects. That gives this bar a really complex taste.

Last night I melted a bar with a little butter. Then I heated up some cream, corn syrup, sugar and a little salt. I blended with the chocolate and ended up with an amazing hot fudge sauce that I served over vanilla ice cream. I know...more biking, but totally worth it.

Thursday, April 10, 2008

Lemon-Blueberry Yogurt Loaf


I have really been suffering through the end of a long winter. I know, the snowboarding was amazing...maybe the best year ever but still, how much ice is one girl supposed to take? The good news is it is finally Spring. I can tell because I'm dying to make an asparagus quiche, strawberries with a little balsamic over ice cream, a fresh green salad with just a little lemon and garlic. you get the picture. So, I started with this blueberry lemon loaf. I found the recipe on another blog and made some changes. They soaked it in a lemon syrup after baking. I instead left it alone, even reducing the over all amount of lemon because I wanted something you could toast and put a little butter on, which by the way was really good. You see, even though it is 60 during the day right now it is still 30 overnight. So, when I wake up, I want something warm with my coffee. Something I can dunk that won't fall apart. This bread was perfect and the blueberries didn't sink. Here's the bad news, I accidentally left my camera at a friend's house so I don't have my pictures. You'll just have to settle for a picture of a market I visited in Jaurez, Peru. I know onions and lemon bread don't really go together but I almost posted a picture of the guinea pigs that we had for dinner...not very satisfying and definitely not a good match with lemon bread. p.s., Susan sent my camera back! Now you can see how great look this bread is right out of the oven.

Lemon-Blueberry Yogurt Loaf
Adapted from Ina Garten

1 ½ cups + 1 tablespoon all-purpose flour
2 tsp baking powder

½ tsp kosher salt

1 cup plain whole-milk yogurt

1 cup sugar

3 large eggs

2 tsp grated lemon zest

½ tsp vanilla extract

½ cup vegetable oil

1 ½ cups blueberries, fresh or frozen, thawed and rinsed


1. Preheat the oven to 350 degrees F. Grease an 8 ½ by 4 ¼ by 2 ½-inch loaf pan. Grease and flour the pan.

2. Sift together 1 ½ cups flour, baking powder, and salt into 1 bowl.

3. In another bowl, whisk together the yogurt, sugar, eggs, lemon zest, and vanilla.

4. Slowly whisk the dry ingredients into the wet ingredients.

5. Mix the blueberries with the remaining tablespoon of flour, and fold them very gently into the batter.

6. Pour the batter into the prepared pan and bake for about 50 (+) minutes, or until a cake tester placed in the center of the loaf comes out clean.

7. When the cake is done, allow it to cool in the pan for 10 minutes before flipping out onto a cooling rack until it is room temperature.

Thursday, April 3, 2008

Dulce de Leche Brownies from David Lebovitz

I've been so sick I haven't wanted to eat anything. This has been going on since Sunday evening. Well, I must be feeling better because tonight m. and I made dulce de leche for the first time. I've wanted to try this forever, don't know what took so long. I read a recipe on one of my favorite sites; David Lebovitz...living the sweet life in paris. The recipe mixes brownie batter and dulce de leche. To make dulce de leche you boil a can of sweetened condensed milk for 2-3 hours. Sounds crazy but it is amazing. You have to let the can cool but once you open it you have sweet caramel cream. I've always been worried about the can exploding which is silly because thousands of grandmothers all over south american have been making it this way and you never hear horror stories about the one who lost her face while making dessert, right?

Dulce de Leche Brownies

8 tablespoons unsalted butter, cut into pieces
6 ounces bittersweet or semisweet chocolate, finely chopped
1/4 cup unsweetened Dutch-process cocoa powder
3 large eggs
1 cup sugar
1 teaspoon vanilla extract
1 cup flour
1 cup Dulce de Leche

1. Preheat the oven to 350 degrees. Line a 8-inch square pan with a long sheet of aluminum foil that covers the bottom and reaches up the sides. Grease the bottom and sides of the foil with a bit of butter or non-stick spray.

2. Melt the butter in a medium saucepan. Add the chocolate pieces and stir constantly over very low heat until the chocolate is melted. Remove from heat and whisk in the cocoa powder until smooth. Add in the eggs one at a time, then stir in the sugar, vanilla, then the flour. Mix in the nuts, if using.
3. Scrape half of the batter into the prepared pan. Drop one-third of the Dulce de Leche, evenly spaced, over the brownie batter, then drag a knife through to swirl it slightly. Spread the remaining brownie batter over, then drop spoonfuls of the remaining Dulce de Leche in dollops over the top of the brownie batter. Use a knife to swirl the Dulce de Leche slightly.

4. Bake for 35 to 45 minutes. The brownies are done when the center feels just-slightly firm. Remove from the oven and cool completely.

Friday, March 28, 2008

Mark Bittman's Bourbon Apple Cake

Almost every recipe Mark Bittman posts is amazing. I am a huge fan. Last night I made the Shrimp stir fry and the Bourbon Apple Cake. Man, the stir fry just didn't work for me. I will take responsibility for some cook's error. However, I found the end result was too sweet. Next time I'll add a jalapeno or some hot pepper flakes to the garlic...maybe even a little lemongrass. The beans were disappointing. I'm going to try it again and maybe rework it a little.

The apple cake was amazing, thank good. Both my dinner companions ate the main course though I did get some, "we're happy you cooked dinner for us but this isn't that great" comments. I made the cake in the food processor, so easy, and baked it in a bundt pan. I'll post a photo when I get home today. I really cooked the bourbon sauce down. The intense alcohol flavor was softened and this morning the cake was perfect. Especially with a cup of coffee.
I am reposting the recipe here. Enjoy!

Bourbon Apple Cake

Time: About 1 hour, plus one hour's resting
2 sticks butter, softened, more for greasing pan
Flour (if using bundt pan)
2 medium apples (about 8 ounces), peeled, cored and quartered
2 1/2 cups sugar
4 eggs
2 1/2 cups all-purpose flour
2 teaspoons baking powder
1/2 teaspoon salt
1/2 cup milk
1 cup bourbon, Calvados, Cognac or brandy.

1. Preheat oven to 350 degrees. Grease a 9-by-13-inch rectangular pan with butter, or butter and flour a 9-inch bundt pan. Put apples in a blender or food processor and purée; remove and set aside.

2. In food processor, combine 12 tablespoons with 1 1/2 cups sugar and pulse until combined. With motor running, add eggs one at a time. Add apple purée and process until just combined.

3. In a large bowl, combine flour, baking powder and salt. Add about a third of flour mixture to apple mixture in food processor. Then, with motor running, add about half of milk; add another third of flour, followed by rest of milk, then finally last of the flour. Process until batter just evens out.

4. Turn batter into prepared pan and bake until middle is set (your fingers should leave only a small indentation when you gently press cake), 45 to 55 minutes. When done, cool in pan for about 10 minutes.

5. Meanwhile, combine 1 cup liquor in a small pot with remaining 4 tbsps butter and 1 cup sugar. Cook, stirring occasionally, until sugar is dissolved and liquid is slightly thickened, about 10 minutes. Let cool to room temperature, then pour over cake; let it sit for at least an hour before serving. (For bundt, let it sit for an hour, then unmold). Store at room temperature, covered with waxed paper, for up to 2 days.

Yield: About 12 servings.

Sunday, March 23, 2008

Salame Dolce - Sweet Italian Dessert

I am totally frustrated with the amount of ice surrounding our home right now. It is glacial and I feel stuck. I know Spring is coming but it is taking forever.
I am planning a party. Really it's a distraction from the 10 degree mornings and the late nights working.
I always start with dessert so I'm scouring cookbooks, notes, the web, for interesting weird intensely tasty little bites. I made the first recipe today. It's called Salame Dolce. Mario has one version on the food network as do a few other Italian sites. I had this in Tuscany. It came with an after dinner drink and I really thought it was a savory slice of salami. Quite the opposite and really good. I served mine with soft whipped cream, slightly sweet. It's sort of fun and super easy. You can play around with the ingredients. I'm going to try it with different cookies next time. Our local coffee shop has these homemade biscotti that are almond orange flavored. For next time. Possible on the first warm day when we can sit outside.

Salame Dolce
2 egg yolks
1/2 cup sugar
5 ounces melted butter
1/2 c unsweetened cocoa powder
1 ounce Grand Marnier, or other liqueur
6 ounces cooking crumbs, a little more than a cup
(Try small butter cookies, or biscotti, can easily be crunchy store bought)

1. Melt the butter and let it cool. Crush the cookies leaving some pieces a little larger than others so they resemble the fat in a salame.

2. Beat the egg yolks with the sugar until smooth. Add the melted butter and then cocoa powder. Make sure each addition is mixed in before adding the next. Add the liqueur mixing to incorporate.

3. Finally, add the cookies to the mixture and stir to combine.

4. Form a salame-like shape and roll it in aluminum foil. Place in the freezer for 3-4 hours or until firm. Unwrap and slice. Serve with soft whipped cream.

Wednesday, March 19, 2008

Ricotta Custard with Tomato Gravy - A little bit of heaven

I can't believe I found this recipe online. I had this custard in Florence at a restaurant called Cibreo. This was no discovery, this place is very established and incredible. Everything we had seemed so simple, as far as ingredients go, but the tastes were very complex. Make this ricotta custard, you won't regret it.
Cibreo's Ricotta Sformata

1 pound ricotta
3 large eggs
1 1/2 cups grated parmesan cheese
nutmeg
3/4 cup extra virgin olive oil
salt
Chopped herbs
( in cibreo’s cookbook it is made with additional 2 kg of spinach, washed cooked down and finely minced)

Butter an 8x8 pan. Preheat oven to 350 degrees.
Mix all the ingredients above and pour into buttered pan.
Bake uncovered at 350 till a film forms on top, about 5 minutes.
Cover with foil and finish baking for 30 - 40 minutes.
It is like a quiche,when the knife comes out clean it is done!

This is like heaven in your mouth! Truly wonderful. It is also amazing with the spinach. You can serve it with additional grated parmesan and a little spoonful of fresh pesto or with the following tomato gravy. I also served it with sautéed artichokes. You can see the tomatoes cooking in the background.


Monday, March 10, 2008

David Lebovitz's Baby Back Ribs in Caramel Sauce

I don't know how familiar everyone is with David Lebovitz. All I can say, is he is amazing. I have 2 of his books and everything works. I've made this rib recipe now a couple of times. They are really easy and amazing. I don't use the fish sauce so I wrote David and he made the recommendation that you see notated in the recipe. Again, easy and delicious. They just simmer on top of the stove for 90 minutes. The sauce takes about 20 minutes to prepare so overall, these take 2 hours. Totally worth it. Don't wait for a sports event as an excuse.

Baby Back Ribs Braised in Vietnamese Caramel Sauce


2 cups sugar
1 cup water
2 tablespoon lemon juice
2/3 cup fish sauce - or water mixed with a little soy sauce and vinegar, in the same proportion
2/3 cup sliced shallots
2 inch piece of Minced ginger
2 tbsp cracked black pepper
1 tbsp chili paste
A pour of Black Chinese Vinegar
2 slabs baby back ribs (4 lbs)

1. Spread the sugar in the bottom of a wide heavy-based skillet. Pour over 1/2 cup of the water and the lemon juice. Let it sit for a minute. Then heat over medium heat until the sugar begins to liquefy. Reduce the heat the medium low and let the caramel boil until it turns red.

2. Remove it from the heat and slowly pour 1/2 cup water and the fish sauce into the caramel. Return to the heat and stir. Let boil for a few minutes, until the sauce is smooth and a bit thick. Add the shallots, ginger, chili paste, black vinegar and pepper and simmer for another 2 minutes. Remove from the heat.

3. Separate the pork ribs into individual ribs by cutting down between the bones. Add them to the caramel sauce, stir to coat, and bring to a simmer over low heat. Cover and braise, stirring every 15 minutes with tongs, for 90 minutes. Don’t let the caramel sauce boil; if the heat is too high then use a diffuser. The ribs are done when they have become tender enough to pull easily away from the bone and are a deep mahogany color. At this point, you can serve them or store them. If you want to store them, let them cool and then store in the fridge for 1 to 3 days. To reheat, pop them in an oven preheated to 350 degrees for 20 minutes.
Serves 4 as a meal

Wednesday, March 5, 2008

Butternut Squash - easy and great!

I grabbed the following recipe from Katy Sparks web site today. A friend sent me the link so of course I took a look around. I also made the curried Cauliflower soup for dinner but wasn't as thrilled with the end result. The squash, however - amazing. I can't recommend this recipe enough. You don't need to change anything. I served it with a good baguette and it was really satisfying, warm, but with a spiciness. Definitely check this out. It would be a good side dish with pork as well...next time.

Roasted Butternut Squash

6 cups of 1-inch cubed squash (acorn or butternut)
3 tablespoons butter
3 tablespoons maple syrup
3 sticks cinnamon
6 strips of orange zest and juice of the orange
6 pieces whole star anise, or 6 whole cloves
3 sprigs of thyme or sage
Salt and freshly ground black pepper

Preheat oven to 400F.
1. Lay the 3 sheets of foil out on a work surface. In the center of each piece, place 2 cups of
diced squash, 1 tablespoon butter, 1 tablespoon maple syrup, 1 stick cinnamon, 2 peels of orange zest, 3 pieces star anise or cloves, and 1sprig of thyme or sage. Season the contents of the packages with salt and pepper. Squeeze the juice from the zested orange evenly over each package.
2. Carefully fold the foil to enclose the contents, making sure that no opening exists for the steam to escape. If your foil is thin, use a double layer. Place the packages on a baking sheet and into the hot oven. Roast the squash for 25-30 minutes.
3. Serve along with the juices that have accumulated in the package, discarding the whole spices, herbs, and orange.

Tuesday, March 4, 2008

Gingerbread cakes - First, you must love molasses

We're finally home and it's good to be back except there is basically nothing fresh in our fridge. On our first night back we threw frozen peas into chili ramen and called it a night.
Tonight, however, we were in the mood for something homey. It's raining outside and there is a lot of work to catch up on so nothing better then procrastinating in the kitchen.
MC and I are in love with Dorie Greenspan so we read every Thursday's; Baking With Dorie hoping it will be something that tempts us. Last week's recipe did the trick. Gingerbread cakes. Not just the average, mild, sweet cakes you usually get, faintly tasting like ginger ...no, these babies have umph! A teaspoon of black pepper, lots of fresh ginger and espresso powder, just to name a few. The only thing I changed in the second batch was reducing some of the molasses for maple syrup.
Daniel Day Lewis' character in, There Will be Blood, would have liked these, he might have even smiled that crooked smile after consuming a small cake or two.

Note: You must love molasses, if you don't, take a pass on this cake.


Johanne Killeen's Gingerbread Baby Cakes

From, Baking with Dorie

- makes two loaves or one 10-inch cake -
2 cups all-purpose flour (Johanne uses unbleached flour)
1/4 cup instant espresso powder
3 tablespoons unsweetened cocoa powder
1 tablespoon ground ginger
1/2 teaspoon baking powder
1 teaspoon salt
1 teaspoon freshly ground black pepper
2 sticks unsalted butter, at room temperature
1 cup dark brown sugar
4 large eggs, at room temperature
2 1/2 tablespoons peeled and finely chopped fresh ginger
1 ½ cups unsulphured molasses
½ cup maple syrup

1. Positon a rack in the center of the oven and preheat the oven to 350°F. Brush the insides of two tea loaf pans with a light coating of butter, dust with flour and tap out the excess. (Or use a 10-inch round cake pan.)

2. In a small bowl, whisk the flour, espresso powder, cocoa, ground ginger, baking powder, salt and black pepper together just to mix; reserve.

3. Put the butter and brown sugar in the bowl of a mixer fitted with the paddle attachment, and beat on medium-high speed until the mixture is smooth and creamy, scraping down the sides of the bowl with a rubber spatula as needed. The butter and sugar must be beaten until they are very light and fluffy, so don't rush it—the process can take 6 to 8 minutes with a hand-held mixer, 3 to 4 minutes with a heavy-duty mixer. Reduce the speed to medium and add the eggs one at a time, beating on high speed for 30 seconds to 1 minute after each addition. The mixture may look curdled, but that's OK—it will smooth out as you continue to mix the batter. Beat in the fresh ginger and add the molasses and maple syrup, mixing on medium speed for 1 to 2 minutes, until completely smooth.

4. With a rubber spatula, fold in the dry ingredients, mixing only until they are incorporated.

5. Divide the batter among the prepared pans and rotate the pans a couple of times to level. Bake the loaves or The 10-inch cake for take 50 to 60 minutes. Take care not to overbake the cakes; they should remain moist.

6. Transfer the cakes to a rack and cool for 10 minutes, then run a thin knife around the edges of the pan to loosen and unmold the cakes. Turn the cakes over so they cool right side up.

7. Serve the cakes warm or at room temperature with a generous dollop of lightly whipped cream and a shower of chopped candied lemon peel, if desired.

Storing: These moist cakes will keep covered at room temperature for 3 days or, wrapped airtight, can be frozen for up to 2 months. Thaw, still wrapped, at room temperature.

Wednesday, February 27, 2008

Milk Chocolate is back!

I'm on vacation out West for a week and my normal cookie jar is out of reach. What to do? Well, the New York Times wrote an interesting article a couple of weeks ago making a case for some of the new milk chocolates on the market. I know, everyone loves dark chocolate, milk is so last century. Fortunately, Ketchum, Idaho, like all super wealthy enclaves, has an amazing market called Atkinson's. I was able to find the two bars pictured above and immediately went about sampling them.
The Scharffen Berger 41% Cacao Milk with sea salted almonds was excellent, really, better than I expected. Smokey, not too sweet and excellent on the tongue. I will definitely buy another, the first being consumed in the name of thorough testing.
The second bar, a Valrhona straight milk with 40% Cacao, was more typical but still good. A little sweet for my liking but clean on the palette. I had the last bit with a cup of coffee, it was a good match.
We'll be in Jackson soon so I'll pick up some other varieties and you should definitely check out the Times article.
It's like dark chocolate is Obama and milk chocolate is Hillary...you don't HAVE to hate milk chocolate just because you've discovered dark chocolate.

Monday, February 18, 2008

Broccoflower Soup


So, I made a soup this weekend because my co-op had the most beautiful broccoflowers ever and I heard on the news that Barack Obama supporters are loving broccoflower...I did a little looking around and customized a recipe that I found on La Tartine that sounded interesting.
In case you were wondering, what is a Broccoflower, here you go:
  • Broccoflowers are a cross between broccoli and cauliflower
  • Broccoli and cauliflower are closely related and fully cross compatible.
  • Broccoflowers are generally considered to have a milder and slightly sweeter flavor than their close cabbage-family relatives.
Broccoflower Soup
2 Tbsp olive oil
1 stick lemongrass, cut in small pieces
1 tbsp chopped ginger root
2 garlic cloves, minced
1 shallot finely chopped
2 Heads Broccoflower, just florets
1 large potato, peeled and diced
1 parsnip, peeled and diced
1 Tbsp coriander seeds, crushed
4 cups of vegetable or chicken broth
Salt and pepper
2 Tbsp basil
Crème fraîche with 1 tbsp freshly ground pepper
zucchini, shredded and blanched, optional

1. Heat 2 Tbsp olive oil in a large pan. Add the ginger, lemongrass, garlic and shallot and cook for 1 to 2 min on low heat until fragrant. Add the chopped vegetables and coriander seed and cook for 5 min.

2. Add the stock. Season with salt and pepper. Cover over medium heat and cook for 20 min. Then add half of the basil and let rest for 2 min before mixing the soup in a blender. MAke sure you really puree.

3. Serve with the rest of the basil, zucchini, and some crème fraîche. How incredible is broccoflower, We should eat it all the time.


Sautéed Broccoli Raab

This is broccoli raab but you can also call it rapini, or just raab. It's official name is Brassica rapa (ruvo group) cultivar spring raab.
Susan sent me this really simple delicious recipe for raab so I made my first batch Saturday night. It was so good that I did the same thing to Chard on Sunday night. I also added some toasted pine nuts.

Sautéed Broccoli Raab

1/4 cup olive oil
6 cloves garlic
bunch of raab, chopped up with large stems removed

Heat the olive oil in a large saute pan over medium, thinly slice the garlic and add to the oil. Don't burn the garlic, slowly brown it till they are slightly crunchy chips.
Strain garlic out and place in a cup until ready to use.
Drain off most of the olive oil and save for another day, it will be garlic flavored.
Reheat the saute pan with about 2 tablespoons of the olive oil. Add the chopped up raab and aute. I let it go till some of it was actually slightly browned. I removed with a slotted spoon and served with the garlic chips on top.
This is really good! Try it! You'll end up loving Broccoli Raab!
Thanks Susan.

Tuesday, February 12, 2008

Peanut Butter Chocolate Chip Cookies

It's snowing out again and we might get a new foot of powder. Mona insisted on making my favorite cookies. I have to say, I was so tired after work today that I was not motivated but once we got started it was actually nice. Hanging together in the kitchen is always good. We talk about all the random stuff, without much direction. Mona's hoping for a snow day so having cookies and milk for a late breakfast tomorrow sounds good, cross your fingers.
Here's the recipe, definitely use maple syrup, the real stuff, it makes the flavor of the peanut butter even better and they aren't too dry like some recipes.

Peanut Butter Chocolate Chip Cookies
8 Tbsp unsalted butter, room temp
1/2 cup peanut butter
3/4 cup light brown sugar
2 Tbsp Maple Syrup
1 egg, lightly beaten
1 Tbsp vanilla
1 1/2 cups flour
3/4 tsp baking soda
1/2 cup salted peanuts, optional
10 ounces good quality chocolate chips, can be bittersweet or dark

1. Preheat oven to 375 degrees F.
In a mixing bowl, cream the butter, peanut butter, and the brown sugar until blended. Then add the maple syrup, egg, and vanilla.

2. In a separate bowl, combine flour, baking soda, and peanuts. Slowly mix the dry ingredients into the liquid, be careful not to over mix. Add chocolate chips last...

3. Drop spoonfuls onto a baking sheet about 3 inches apart and flatten slightly with floured fork tines. Bake until pale golden, 7 - 8 minutes. Cool the cookies on a wire rack.
About 2 dozen.

I forgot what spiked my real inspiration for peanut butter cookies...my friend Susan made a recipe from Dorie Greenspan's Baking and sent me her picture. Peanut butter cookies look exactly like they taste, sandy, rich and delicious. I almost always add chocolate...by the way, how incredibly good looking is Daniel Day Lewis? I mean really, it shouldn't be allowed. Him walking around looking like that.

Monday, February 11, 2008

Beet Frittata Muffins

In my quest for more vegetables on my table I made this frittata that I saw on one of my favorite sites, Lucullian. 4 ingredients, you can't go wrong and it was really good. I added more parmesan and it worked for me. I served it with korean style ribs that, although not vegetarian, were really, really good. The rib recipe is from David Lebovitz's blog which is one of the great sources for dessert recipes. Anyway, check these out, they're interesting.

Beet Frittata Muffins
1 medium red beet
2-3 eggs
3-4 tblp freshly grated parmesan cheese
1-2 tsp fennel seeds
Salt
Extra-virgin olive oil

1. Dice the beetroot and braise it slowly in some olive oil. Add the crushed fennel seeds when they are half done. You will need to slowly cook on the stove top for about 10-15 minutes.

2. Whisk eggs, parmesan and salt together, just to mix them.

3. Mix the beets with the eggs and then pour it into muffin cups or a lined muffin tin, and then bake them at 350 degree for 5-10 minutes.

Let them sit for a minute and don't cook too long.

If you love Cauliflower

I am trying to only eat meat and fish once or twice a week so I'm mixing up as many vegetarian recipes as I can find or remember. This frittata is so easy to make and it's really great. You quick stir fry the veges and then pour on the eggs. I think the whole thing takes me 30 minutes. I don't like to use breadcrumbs from the store so I'll toast a piece of bread and then break it into small bites for the top. I also grate the parmesan roughly not fine. That way everything is sort of chunky with individual tastes coming through. Do make sure to use good parmesean.

3 Tbsp butter
1 Tbsp olive oil
1 small or half a large head of cauliflower cut into 1 inch florets
sea salt
1 med. onion, thinly sliced
3 cloves garlic, thinly sliced, don't bother mincing
8-10 large eggs, lightly beaten
Bread-crumbs, enough to lightly cover top
Freshly grated Parmesan

Serve with good sea salt and balsamic vinegar

Preheat oven to 400 degrees.
1. In a large skillet melt 1 Tbsp butter with the olive oil and add cauliflower. Season with salt and pepper and cook for 2-3 minutes over high heat without stirring, till they start to turn brown on bottom.
After 3 minutes start stirring cooking till golden all over, about 3 more minutes. Add the onion and another tablespoon butter. Cook stirring about 3 more minutes, trying not to burn the onion. Reduce the heat to medium and add the garlic cooking for about a minute. Add the final tablespoon of butter to the pan and set aside for a minute.

2. Whisk the eggs together with 3/4 tsp salt. Pour over the cauliflower and put back on medium heat. Gently cook the frittata for 2 minutes, till the bottom is set. Then, start lifting the edges and tilting the pan so that the raw egg mixture pours underneath. Continue this till the top is just runny, about 3 minutes.

3. Lightly cover the top with your breadcrumbs and put in the oven for 3 minutes or so, till it is just set, try not to overcook, it's good a little soft. When you pull it out, add the parmesan and serve with good salt and balsamic vinegar if you like.

Sunday, February 3, 2008

Bostock or the best almond breakfast bread ever


We were in a pastry shop in Brooklyn called Joyce Bakery near my sister's apartment and they had this amazing breakfast treat. A slice of Brioche or Challah covered with an almond cream and then finished off in the oven. I went every morning assuming I'd never have it again. Then, while flipping through my Dorie Greenspan cookbook a saw a small aside about this combination. Apparently it's called Bostock and it is so easy and delicious to make.

Bostock
6 Tbsp butter, softened
2/3 Cup sugar
3/4 ground blanched almonds
2 tsp flour
1 tsp cornstarch
1 large egg
2 tsp dark rum or 1 tsp vanilla

1. Heat the oven to 350 degrees.

2. Slice some challah or brioche into 1/2 to 3/4 inch thick pieces. If the bread is slightly stale it is easier to work with.

3. Cream the butter and sugar in a food processor, I use my mini prep.

4. Add the ground almonds until blended.

5. Add the flour and cornstarch and mix until incorporated then add the egg. Process for about 15 seconds so the cream is homogenous.

6. Add either the rum or the vanilla, pulse till just blended.

I make the almond cream the night before so it solidifies and is easier to spread in the morning. Put about 3 tbsps on each slice leaving a little border around the edge. Scatter some sliced almonds on the top, if you like, and toast for 10 to 15 minutes.

Serve warm.